Exile III: Ruined World
Hint Book
Table of Contents
Chapter 2: How to use the hint book
Chapter 3. Where are the spells and recipes?
Chapter 4. Walkthrough Part 1 – The First Battles
Chapter 5. Walkthrough Part 2 – Troglos, giants, and golems
Chapter 6. Walkthrough Part 3 – Blackcrag and the Endgame
Chapter 7. Maps of Valorim and the Caverns
Chapter 8. The Artifact Quests
Chapter 11. Other things to try
Chapter 1: Introduction
Welcome to the Exile III: Ruined World hint booklet, the one stop shopping cure for confusion, uncertainty, and just plain being stuck. This book will walk you, step by step, through all the twists and turns of solving Exile III, help you out with the myriad side quests, and point out some interesting things you may have missed along the way.
Designing a computer game requires maintaining a very delicate balance. On one hand, you don’t’ want the puzzles to be too easy. Players will forgive one for making a game overly hard, but nothing kills a game faster than being tediously easy. On the other hand, however, every puzzle put in, no matter how seemingly innocuous, will cause someone to get stuck. That person, once stuck, will no longer be having any fun. I want, more than anything else, for players of my games to have fun.
Thus, this hint booklet. I have only played one or two games in my life in which I never got stuck and needed a hint, and I suspect most other gamers are the same. There is no shame in using a hint book. There’s nothing wrong or immoral about it – it’s just one tool you can use to make your leisure time more fun, and to keep from spending any more hours staring at that stupid puzzle button than you have to.
So good reading, and good luck. And, whenever possible, please have fun.
Chapter 2: How to use this hint booklet
OK. You’ve been trying for hours to break through those barriers in the slime cave, or to get in to see the chief spider, or to complete any of Exile III’s other tricky tasks. You give up. It’s not fun anymore. It’s time for a hint.
There are basically two sorts of puzzles in Exile III: puzzles that are related to solving the game, and puzzles that aren’t.
For the first kind of puzzle, there’s the walkthrough. This is a simple, step by step guide to completing the game. It is contained in Chapters 4-6. At the beginning of each of these chapters is a list of the puzzle solutions given within. Thus, for example, if you’re not sure what to do with the friendly cockroaches, you could flip to Chapter 4, and notice that one of the topics listed at the beginning is the friendly roaches. You could flip to that section of the walkthrough, read, and be enlightened.
Note, however, that the walkthrough gives only the simplest, most direct path through, with very few frills. Only doing what’s in the walkthrough will get you to the end, but you’ll miss much of the detail and flavor of the game. Feel free to frequently stray from it.
Also, Exile III has quests for five powerful artifacts, like the Fury Crossbow and the recipe for Knowledge Brew. If you want to hunt for one of them, full descriptions for how to find them are given in Chapter 8.
Many puzzles, however, are unrelated to winning the game or finding a major artifact, but are just there for fun. Should the puzzle you’re interested in not be discussed in Chapters 5-8, turn to Chapter 9, where there is a section for each area of Upper Exile and Valorim. Your problem should be solved there.
If you can’t find a certain spell or alchemical recipe, turn to Chapter 3, where the locations of all spells and recipes are listed. If you can’t find a town or dungeon, look on the maps in Chapter 7. Note that some locations marked on the map won’t be visible to you at first. You may need to complete some sort of question to be able to find them.
Finally, many of the directions give a coordinate in the dungeon you’re in (e.g (20,7), for the 20th space right of the left edge and the seventh space down from the top edge). To find out where you’re currently at, cast the first level priest spell Location.
One final warning: Exile III has a wide variety of plot twists. Try not to read too far ahead in the walkthrough until you have to, or the surprises may be spoiled!
Chapter 3: Where are the spells and recipes?
In a game as large as Exile III, it’s very easy to miss the location of an important spell or recipe. Fortunately, their locations are given here. Certain spells are given by entering one of the stone circles you find outdoors occasionally. The locations of the stone circles are marked on the map of Valorim.
Mage Spells:
Identify – Ivanova, in Golddale, or the Moon library, or Velnas, in
Gale.
True Sight – Fort Emergence mage area, or Velnas, in Gale.
Summon Beast, Conflagration – Arion, in the Inn of Blades, or Velnas, in
Gale.
Wall of Force, Flame Arrows – In the Slime Pit, or Velnas, in Gale.
Weak Summoning – In Agate Tower, or Velnas, in Gale.
Poison, Slow Group – Buy from Sara, in Shayder.
Ice Bolt – Reward from Solberg (wipe out slimes), or buy from Sara, in
Shayder.
Magic Map – The House on a Hill, or from a stone circle.
Capture Soul, Simulacrum – Koriba, in Ghikra.
Venom Arrows – Reward from Solberg (wipe out slimes), or from Great
Walls.
Stealth, Major Haste, Shockstorm, Spray Fields, Fire Barrier – Buy from
Spragins, in Sharimik.
Firestorm, Summoning – Reward from Solberg (wipe out roaches), or from
Spragins, in Sharimik.
Dispel Barrier – Reward for doing Mayor Knight’s mission, in Sharimik.
Major Poison, Group Fear - Buy from Erika or Khoth the dragon, or from
Black (in Calloc).
Kill, Paralyze – Buy from Erika or Khoth the dragon, or from Macintar.
Daemon- Reward from ‘X’ (wipe out troglodytes/giants), or buy from Koth
the dragon.
Antimagic Cloud – Tower of Vahkohs, Gale Library, or buy from Khoth.
Mindduel – Reward from ‘X’ (wipe out troglodytes/giants), or Tower of
Shifting Floors (level 2 library).
Flight – Moon Library.
Shockwave, Protection – Reward from ‘X’ (wipe out golems).
Major Blessing – Ghikra (enter from west on boat).
Mass Paralysis – Stone circle, or Gale library.
Major Summoning – Tower of Magi, or Petrid, in Blackcrag Fortress.
Force Barrier – Tower of Vahkohs, or on Maddok Isle (outdoor encounter
with wights).
Quickfire – Petrie, in Blackcrag Fortress.
Death Arrows – Remote Cavern (far north of Calloc, see
Chapter 8 section on Black Halberd), or fifth stone circle.
Priest Spells:
You get the first five priest spells from levels 4
through 7 by joining the Anama and reading the prayer books on the second level
of the Anama temple in Shayder. In addition:
Symbiosis – Mage area of Fort Emergence.
Minor Mana, Summon Spirit – Paulo, in Pergies.
Ritual of Sanctification – Hermit in Adobe Hut.
Move Mountains – Paulo, in Pergies, and ghost in Tower of Magi after
disaster.
Cure Paralysis, Manna, Forcefield – Tekora-Tel, in Ghikra.
Restore Mind, Smite - First stone circle, and Tekora-Tel, in Ghikra.
Cure Party Poison, Curse All, Dispel Undead, Remove Curse, Sticks to Snakes,
Martyr’s Shield – Ahonar, in Shayder.
Cleanse, Firewalk – Ahonar, in Shayder, and in the ruined town of
Ovdipur.
Bless Party, Major Heal, Flamestrike, Mass Sanctuary, Summon Host, Shatter,
Dispel Fields – Ellyn, in Sharimik.
Raise Dead – Moon library.
Heal All, revive, Hyperactivity, Destone, Summon Guardian, Mass Charm,
Protective Circle, Pestilence – Clarisse, in Tower of Magi, and Zachariah,
in Gale
Revive All – Moon library, Tower of Shifting
Floors (level 2 library).
Ravage Spirit, Avatar – Khoth library.
Resurrect – Find in Torria ruins.
Divine Thud – Tower of Shifting Floors (level 2 library)
Wall of Blades, Major Cleansing – Elhioc’s spell book, under Castle
Troglo.
Word of Recall – Remote Cavern (far north of Calloc, see Chapter 8
section on Black Halberd), or from Bohen_Ihrno, in Defiled Crypt.
Alchemy Recipes:
Weak Curing, Weak Healing – Walner, in the Portal Fortress.
Weak Poison – Piglet, in the Tower of Magi, and Bulon, outdoors near the
Wolfrider Warren.
Weak Speed - Piglet, in the Tower of Magi, and Kurtz, in Fenris Port.
Medium Poison - Kurtz, in Fenris Port.
Medium Healing, Strong Curing – Grossi, in Sharimik.
Medium Speed – Carlos, in Lorelei.
Graymold Salve, Weak Energy – Carlos in Lorelei, and Kyhar, in Ghikra.
Potion of Clarity – The library of Khoth, or the library in Moon.
Strong Poison, Strong Healing – Nantier in Gale.
Killer Poison – In the Gale library.
Resurrection Balm – Zalifar, in the Remote Aerie, or Howar in Blackcrag
Fortress.
Medium Energy – Howar, in Blackcrag Fortress.
Knowledge Brew – See Chapter 8.
Chapter 4. Walkthrough Part 1 – The First Battles
Topics Covered:
Krizsan
Province
What do I do at the Agate Tower? Where is the slimes lair?
Once inside, how do I get through the portcullises on the lower level? How do I
defeat the slimes? How do I destroy a slime pool?
The Isle of Bigail
Who are the Anama,
and should I join them? Where are the roaches being created, and how do I find
and destroy them? What do I do with the friendly spiders? The friendly roaches?
How to I get through then Filth Factory? How do I destroy it?
The New Formello Murders
What’s the
deal with this? Can I solve them?
Fort Emergence
You start in your bedroom in Fort Emergence. You can return here to rest at any time. Get the scroll and read it (by using it). Look in the dressers, and get the stuff. Go talk to Anaximander, who is located at (1,5). He'll tell you to go to the surface, although you can go gain experience in two dungeons in Upper Exile first. These are the Goblin Lair and the Bandit Hideout. There is a map to them in the bookshelf at (10,4).
You can, if you wish, go explore Upper Exile by leaving Fort Emergence to the south. When you're ready, you can go out onto the surface by leaving to the north.
Krizsan Province and the Slimes
Upon reaching the surface, head south to the ocean, and look for the city of Krizsan. Entering and asking around, you can find out about the horrible invasion of slimes that has been tormenting Krizsan Province. Destroying the slimes is not necessary to win the game. However, if you don't destroy them, you must eliminate the cockroaches on the Isle of Bigail to be able to win.
Speak with Mayor Arbuckle, who will give you a mission to go destroy the slimes. Then search town until you find Dawn the sailor. She will tell you of strange lights she has seen on the coast to the west. This is a good place to investigate.
Heading west from Krizsan, you can find the Agate Tower. This is an important, but tricky dungeon. You may wish to adventure elsewhere to gain experience before venturing inside.
Once in, you need to get to Jordan's library, where you will find out the location of the Slime Pit and the main weakness of the slimes. Walk down the entry corridor, and get dropped into the basement. Go through the door at (7,32). You will be in Jordan's inner sanctum. Explore it, kill him, and search the bookshelves around (13,42). You will now know where the Slime Pit is, and have learned that fireballs destroy the pools where slimes are made.
Leave this area through the door at (15,39). Head east, destroying the slime pool with a fireball if you want, head north, and climb the stairs at (23,27). Pull the lever at (19,24) to turn off the corridor traps, and walk out.
Now, if you're feeling strong, you can assault the slime pit, southeast of the town of Colchis, which is east of Krizsan. Exploring Colchis thoroughly, you can find two magical items which can provide protection against the slimes' nastier magical effects.
When ready, enter the Slime Pit. Head west to the pedestal at (32,29). This is the first of many button puzzles you will encounter. There are five stairways down on the first level of the slime pit. The location of each button on the pedestal corresponds to the location of a stairway down. When pressed, the button will open the gate at the base of that stairway. Explore the level, pick a stairway, press the button corresponding to that stairway, and climb down it.
Level 2 consists of five separate sections, each populated with slimes, and each ending in a slime pool. Proceed through each section, destroying the pool at the end with a fireball (one tip - in the long west tunnel, there's a secret passage at (7,14) ). When all the pools are destroyed, the barriers on the other sides of the pools will disappear. Go through, and kill the gigantic Alien Slime. Once dead, the slimes will disappear, and you will have successfully completed this quest.
Go through the secret passage at (24,3), and find the magical rune. Leave the Slime Pit and go to Krizsan to get your reward from the mayor, and the return to Fort Emergence. Speak to Berra the mage (in the southeast section of Fort Emergence) and ask him about 'evidence.' He'll tell you something interesting. Sometime soon, a visit to Erika will be in order.
Then see Anaximander. He'll congratulate you, and tell you to visit the Tower of Magi for magical training. Leave Fort Emergence to the south to enter Upper Exile. Go to the Portal Fortress, to the west. Speak with Seles to get permission, and then enter the portal at (5,42). Find Solberg, and he'll give you spells. Each time you complete a monster mission, go speak to either 'X' or Solberg, and one of them will give you some new, powerful spells.
At this point, everything regarding the slimes is pretty much settled, and it's time to move on. Adventure (and major grossness) awaits you on the Isle of Bigail.
The Isle of Bigail:
The Isle of Bigail can be reached by going to Farport, going up to the docks, and taking the ferry across to Port Townsend. This island is home to a religious group called the Anama, and a horde of gigantic, disease carrying cockroaches. You might want to join the Anama (read the next section for more on this). You definitely want to kill the roaches.
From Port Townsend, go northwest to Shayder, the main city on the island. Ahonar and Sara know a variety of useful spells. After looking around, speak with Arkley, in the library in the northeast corner of town. He tells you about some friendly spiders near Bavner, and about a potentially helpful mage in the ruined city of Kneece. Finally, see Mayor Bernathy to get the mission to kill the roaches. Start with the friendly spiders (which players of Exile and Exile II will most likely remember well).
The Giant, Friendly, Intelligent, Talking Spiders live 10 spaces west and 21 spaces north of Bavner. Enter, and go to (18,3). Talk to the guard spider, and tell him the chief spider's name is 'Spider.' (All spiders are named Spider.) Go past, and talk to the chief. He will tell you of the existence of friendly cockroaches, and tell you the location of their lair if you help the spiders with a combat. Leave the spider lair, and enter the space 10 spaces northwest of the spider lair, surrounded by rocks. Do the combat, and return to the chief spider. He'll tell you about the roach lair.
The Giant, Intelligent, Friendly, Talking Roaches live about 35 spaces directly north of the spider lair. Enter, and either speak with 'Filth Spreader' or find the map etched in filth in the northwest corner. Either of these will tell you where the Filth Factory, where the roaches are raised, is located.
Now you're ready to go speak with Purgatos, in Kneece. Enter Kuper, go to the docks, and take the ferry across to Kneece. Purgatos lives in the very center of the ruin (when asked if you want to pass through a thin barrier, say yes). Speaking with Purgatos will get you the Phoenix Egg (an artifact introduced in Exile II). You are now ready for the assault on the Filth Factory.
The Filth Factory is west of some mountains, up the shore north of Shayder. You'll have to fight two large groups of roaches to enter. Once inside, you'll run into a serious problem: the factory's creators have sealed all routes to the core of the factory. You'll have to be very clever to get in. The most direct route (which will cause you to miss some cool stuff) through is:
Head up to (52,11). The southwest passage leads to the control room. First, clear out all the monsters between there and the door at (52,28). Go back to the control room passage and send a single character through the barrier. There are several fights ahead. Note that if the lone character gets beat up, it can go back to rejoin the party and get healed. When you work through to the control room, go to the panel at (41,15), and press the button that stops the garbage flow. This makes a new area open to you, for a short time. Have the lone character rejoin the party, and go by the most direct route to (52,28), and from there to (47,32). Go through the trench through the south, and then through the locked door at (52,36). Go down the stairway.
You're now near the factory machinery, but it's protected. You're also trapped in this section. You'll need to cause an explosion to force your way out. Go pull the lever at (49,34) to close off the pipes, and then the lever at (50,23) to send fluid through those same pipes. Go down to (54,35) through the hole in the wall, and use the teleporter.
Head up to (47,2) (use the teleporters in the corners to save time). Go south through the crack, west, and then south to reach the entrance to the circles of trash around (14,30). Also note there's a stairway up at (5,39). You're going to need to use it soon.
Work your way into the center, stopping at (26,36) to get the scales. When you reach (25,28), you'll be asked if you want to use the Phoenix Egg. If you're ready to make a run for it, say yes. Quickfire will soon pour out of the center, so leave immediately, taking the most direct route out of the trash circles. If you get stuck or trapped by monsters, going into combat mode and using multiple haste spells is the best way to outrun quickfire. Go up the stairway at (5,39), and out. You win. Go back to Mayor Bernathy to get your reward. It's time to move onto Sharimik and the troglodytes.
The Anama:
The Anama church is based on the idea the magic, while it has its point, is too dangerous to encourage and should be forbidden (in this setting, by the way, they do have a point). Joining the Anama keeps you from using magical spell, but gives you much greater priest power, many free priest spells, and enables you to enter the Anama inner sanctum.
To join, go talk to Ahonar in Shayder and ask to ‘join’. Then go talk to Father Rice in Port Townsend, Mother Loomis in Bavner, Mother Melamed in Kuper, and Father Gavlax in Fenris Port. Ask them about their beliefs, and when they ask you what you think, say you agree. Return to Ahonar and ask to ‘join’ again. You’re in!
No go upstairs to get your many free priest spells, and buy a lot of cheap piercing crystals (which destroy magical barriers and magical locks on door). Note that now all of your characters now have higher Priest Spells skill. In other areas of Valorim, you will meet Anama members. They will help you out if they can.
If you ever want to leave the Anama, buy a Mage spell. You’ll lose everything you gained, lose your Anama rings, and have to relearn all your Mage spells, but you’ll be out.
The New Formello Murders
Sometime around now, Anaximander will tell you a pair of grisly murders that happened in the Upper Exile town of New Formello, and ask you to investigate. Travel there, and speak with Flanagan. Then head north to the Murder Cave. There’s an important item there that you need.
Inside the murder cave, go to (6,9) to inspect the bodies. Interesting, but you need to do more. Go through the secret passage at (7,7). Fight your way through the tunnels, and step on the special encounter at (25,2). The key there will be important later on.
Chapter 5. Walkthrough Part 2 – Troglos, giants, and golems
Topics Covered:
The
Trogolodytes
How do I enter Sharimik? How do I get Mayor Knight to give
me a mission? Where is the Ritual of Sanctification Spell? Where is the troglo
altar? How do I enter Castle Troglo? What does Vathkaro want? How do I reach
Elhioc? What then?
The Giants
How do I enter Lorelei? How
do I enter the giant’s caverns? Where is the map the giants have? How do I get
in there? Where do I go from there? How do I get through the Concealed Tunnel,
and what do I do once I pass it?
The Golems
How do I enter Gale? Where
are the golems coming from, and how to I get in? What do I do with the four
spires around the golem’s tower? How do I reach the northern spire? How do I
get through the golem’s tower? What do I do in Erika’s tower? The dragon
caves?
Side Missions
How do I recover the Orb
of Thralni? What do I do about the big mess in the Tower of Magi?
Now that the easy monsters have been vanquished, it’s time to move on to the much more challenging and complicated quests: the troglodytes and giants (who are linked), and the golems. It is only necessary to complete one of these quests to finish the game.
About this time, Anaximander will send you to deal with two other issues: the Orb of Thralni, and the Tower of Magi. What to dat these points is dealt with at the end of the chapter. Also, by now you’ve assembled a variety of evidence implicating various beings for causing the havoc on the surface. What to do with all this is described in the section in this chapter: Dealing With the Evidence.
By this point, you are probably finding that traveling around Valorim is somewhat tedious. Fortunately, Anaximander will soon give you a teleportation amulet, which makes returning to Fort Emergence very fast. Also, be sure to find the Remote Hut on the surface northwest of Fort Emergence. This will also save massive amounts of time.
Sharimik and the Troglodytes
It is now time to start fighting the hordes of humanoids who are assaulting central Valorim. This is a long and involved mission, and begins in the city of Sharimik. You need to have completed either the slimes or the roaches mission before they will let you into town.
In Sharimik, speak with Mayor Knight. He will help you fight the troglodytes, but only if you pass through the bureaucracy first. First, talk to garrison commander Corie. She will send you to destroy a troglodyte alter in return for her permission.
Move northwest to Softport, and ask Nydia about ‘Corie’. Leave town, and head as due north as possible. You’ll find a mountain range. Go into the valley at the north end of the mountain range, and enter the Adobe Hut. Ask the hermit about ‘troglodytes’ and receive the Ritual of Sanctification. Note that this spell takes 50 spell points to cast.
Now head back down to Sharimik, and then east to the Troglo Temple. There is a stairway up at the east end of the large central hall. Climb it, and cast Ritual of Sanctification on the altar at (25,13). Return to Corie for her blessing, and speak to Mayor Knight again.
He will then send you to Levin. Levin, a man with much simpler needs, simply requests a 1000 gold bribe for his permission. Pay the man, go back to Mayor Knight, and get the diplomatic scroll he wants taken to the trogolodytes.
Castle Troglo is northeast of Sharimik. Go up there, enter, walk into the entry hall, and agree to be blindfolded. Once in the cell, wait for a while. You’ll be told to come out. Walk out, and you will be hustled back into your cell. This had a purpose – there now a scroll in your room! Read it. Wait a while more. The guards will open the door again, and you can go out to meet King Voghkaro, at (47,34).
He will tell you something very important – that he wants to fight the giants instead of the humans. He is prevented from doing so by a huge magical barrier keeping the two races apart. If the barrier is destroyed, the troglodytes will be able to fight the giants instead of you. However, the shaman Elhioc opposes this plan. Vothkaro says that if you slay Elhioc, he will help you destroy the magical barrier.
Once you get this quest, go back to your cell and go through the secret door at (52,51). Go down the stairs.
Elhioc is at the northwest corner of the lower level. The easiest way to get there is to head all the way north and then all the way west, until you reach the pedestal at (13,16). The buttons on the pedestal shift the walls to the west. Set the numbers at the top to ‘543202’. Walk through the narrow crack in the stone walls, find Elhioc, and kill him. Head back to the stairway up at (48,50). Climb up, receive the information from Vothkaro, and leave through the secret exit at (58,56). You now know that the giants have the map to the magical device that’s making the barrier.
Go back to Sharimik, give Vothkaro’s message to Mayor Knight, and receive your reward: the spell Dispel Barrier! It’s in the spell book in Sharimik at (53,51). Return to Fort Emergence for the standard rewards, and then move north to Lorelei.
One note about Castle Troglo – once you destroy the barrier, you can return and explore the entire upper level.
Lorelei and the Giants
To continue the troglodyte/giant quest, you need to head up to Lorelei. Like Sharimik, you need to have completed the slime of the cockroach quest before they’ll let you in.
Once in, Mayor Bruette isn’t much of a help. Speak instead to Bruskrud, who'll tell you where the giants are and give you an incidental quest (free prisoners and recover personal effects). Then go southeast to the Cavern of Giants.
An easier way to approach this dungeon is to enter the Forge of the Giants, west of the Cavern of Giants. Inside, you can find Smite, a weapon that gives major bonuses against giants. It’s at (23,43). Then go through the passage at (43,44), and you will be in the lower level of the Cavern of Giants.
To go farther, you need one of the giant’s keys. There are two of them on the lower level, one at (4,34) (with the nagas), and one at (56,15). To get the second, you’ll need to go to the first level, go down the stairway at (57,1), and stop on the right spaces to open a bridge over the water to the key. To do this, note that certain water spaces in this cave can be walked on, and that you can move diagonally.
Once you have a key, go through the door on the lower level at (47,23). The rune on the floor is another button puzzle. You need to make all seven words appear. To do this, starting from when none of the words are visible, press the two buttons to the right, and the two to the lower left. The gate to the right will open. The map is in the chest at (60,26). Once you have it, you’re pretty much done with the giants. It’s time to destroy the barrier.
Destroying the Barrier
To reach the tunnel indicated on the giant’s map is a long hike. You need to march around the mountain chain to the east. Look on the map of Valorim, find the Concealed Tunnel, and make your way there. Reading the map you took from the giants makes this dungeon become visible.
Once inside, you need to solve several puzzles. First, you need to find five barrels, and push them into pits (look thoroughly for secret passages) to move into the first room.
When there, you need to dodge around moving walls. To get through the gap at (7,40), use the crate at (13,41). Moving walls are blocked by crates, so move it so it traps the moving wall in the alcove to the north. Go through the portal at (5,42).
Dodge around the moving walls and make your way to the west. In the large room with the undead ambush, walk through the secret passage at (15,24), and pull the lever at (11,27) to open the portcullis to the north. Go through them, and pull the lever at (21,4) to open the portcullis blocking the exit. Go out at (4,18).
At last, you’re in the barrier. Go to the crystal at (7,17), and break it. Lots of monsters will appear. Run, and let them fight each other. Return to the crystal, to pick up a few shards to use as evidence.
This mission is finally done. Go back to Fort Emergence and go see Anaximander, Levy, and ‘X’ to get the standard rewards. Visit Berra and ask him about ‘evidence’ to get the crystal shards analyzed. Yet another suspect has been added to the pool. It may well be time to start investigating them.
Dealing With the Evidence
By now, you should have received evidence implicating Erika, the dragons and the Vahnatai in the creation of the plagues of monsters on the surface. It’s time to visit them – each has something to give you.
First, go visit Erika, at the northern end of Upper Exile. She is in her tower at (24,30). Speak with her. She will offer to give you assistance, in the form of an amulet which will help her aid you in your quest. The amulet is on the pedestal at (4,29). You can explore other parts of the tower if you want, although it’s quite dangerous. Get the amulet, take it to Erika, and tell her you accept her help. The amulets will be activated, and you have what you need here.
Then go to Ghikra, and talk to Rentar-Ihrno. She will tell you a quick message about the shards, and deny all involvement in the mess on the surface.
Finally, visit the dragons. Their caves are in the mountains west of Dorngas. Enter either the Cave of Khoth or the Cave of Athron, and walk through until you find a place to climb down. Climb down to the Lair of Sulfras.
You need to speak with Sulfras. He’s at (23,24), and be reached through the portcullis at the north end of the cavern. Ask him about ‘sword’. He will offer to make you a good weapon. Go kill the alien beasts at (41,1), return to Sulfras, and ask about ‘sword’ again.
Go to the Lair of Khoth by climbing up at (45,46). Enter his library, and search the bookshelf at (22,11) for instructions on how to make the blade. Speak to Khoth and search the other bookshelves if you want. There are spells and recipes to be learned here.
The go over the Cave of Athron. Athron just had baby dragons, who are not friendly at all. Go through the secret passage at (12,25) to avoid them, and search the box at (20,24) to get the metal Sulfras needs. Finally, return to Sulfras and ask him about ‘sword’ to obtain the Beastslayer Blade. This will be a big help in Footracer Province.
Fighting the Golems
The golems have ravaged Monoroe Province, the northeastern corner of Valorim. Golems are nasty, and their dungeons is exceptionally large and hazardous. Many adventurers will be unable to complete it unaided. Fortunately, you don’t have to finish it to win the game (though if you skip this, you do need to complete the troglo/giant quest).
First, visit the city of Gale to see what a mess everything is. You need to have completed either the slime or the roach mission to enter Gale. To get in, enter Gale and speak to Pasi at (57,6). Will open a passage in. Also, he mentions that you should speak with Roselei, who said she knew something about the golems.
Unfortunately, while you can buy supplies at Gale, nobody there is much help in dealing with the golems. Still, you can find out about General Baziron, in the town of Tevrono to the north. He is a good source of information.
Also, go talk to Roselei, in bed in the herb house at (14,16). Ask her about ‘golems’. She will tell you how to find somebody very important.
At this point, if you haven’t already, should go do the Orb of Thralni mission, described below. If it isn’t available yet, wait until it is. Completing the troglos/giants mission makes the Orb mission available immediately.
Go up to Tevrono and speak with General Baziron, who will tell you much about the golems. Then go to the mountains southeast of Tevrono, and fly up to the Remote Aerie. It may take a bit of flying before you find it.
Once inside, speak with Zalifar. He will tell you where the golem’s tower is, but only if you do something to keep a certain drake from attacking him.
Head west to Greendale, then go south from there until you find a huge field of rubble (it’s across the river). Fly up into the mountains to the west to find the Drake Aerie. Enter, and approach the Drake Lord Dalikros.
At this point, you can either kill Dalikros (tricky) or convince him to stop attacking Zalifar peacefully. To do so, approach him. When he demands your food, give it to him. Speak with him, and say ‘agree’ to him. Leave, and head back to Zalifar. Zalifar will tell you where the golem tower is when you ask him about ‘spire’. He will also tell you about four spires which feed power into the golem tower. These must be destroyed.
You’re now ready to destroy the four power spires. Each is in a different direction from the golem’s tower, the Tower of Shifting Floors. One spire is north, one south, one east, and one west. To destroy a spire, enter it, and kill the Power Crystal within.
The south and east spires are in the forest, and not hard to reach. The west spire is in the mountains, and you need to fly to reach it. The north spire is the hardest to reach, however. To reach it, you need to go into the Tower of Shifting Floors first.
Enter the tower. The Tower of Shifting Floors is a massive, four level monstrosity of a dungeon, filled with vicious monsters and nasty puzzles. To defeat it, you must first reach the control panel on the second floor.
On the first level (the factory floor), make you way to (2,2). This is where the stairway up to level 2 is. On level 2, you need to get to the control room in the southeast corner. To do so, make your way on the conveyer belts to the southwest corner, and head east. Go through the secret door at (56,43), and pull the lever at (57,35). You will be able to enter the control room now, through the entrance at (59,48). You can get back there quickly by using the secret door at (44,34).
In the control room, use the panel at (52,50). Press the buttons ‘Belt Beta’ and ‘Belt Alpha’. Pressing the Alpha button switched the conveyer belts so that you can enter the library in the southwest corner of this level. The Beta button changed a conveyer belt in the basement so you can reach the northern power spire.
Leave the control room, go back up to the stairway down at (5,6), and return to the first level. Find your way to the stairway down at (23,61). On your way, if you want, you can destroy some of the golem making vents by casting Dispel Barrier on them. It doesn’t really make much of a difference, however. Go down the stairway.
When you descend to this level form level 1, the portcullises at (23,26) and (25,26) will be open. Pass through one of them and move to the north end of the dungeon. Leave at (12,4), and you will find yourself outside, by the northern power spire! Enter, and destroy it.
Reenter the Tower of Shifting Floors, and climb back up to level 2. Get to the stairway up at (32,4) by traveling all the way around the level on the belts. Climb to the top level.
Fight your way around to (17,33) or (30,33), enter the Hall of the Mind Crystal, fight your way north, and kill the Mind Crystal. Victory is yours – the golems have been vanquished!
You will get shards from the wreckage of the mid crystal. Take it to Berra in Fort Emergence, and get the bad news about who is creating the monsters. Go to Levy and ‘X’ for the standard rewards. It is time to move on to the endgame.
Recovering the Orb of Thralni
Around day 130 (or sooner, if you destroy the troglo/giant barrier early), bandits will break in to Fort Emergence and steal the Orb of Thralni, the legendary artifact that enables the bearer to fly. You must go recover it.
Anaximander will tell you of its theft when you return to his office, and tell you to go speak with Levy. Do so, and he will tell you to speak with Seles. Go the Portal Fortress and speak with her, and then use the portal. You will find yourself in a cavern, under attack.
Leave the Arrival Platform, and make your way west, south and east to the Subterranean Dock. Enter it, steal a boat, and make your way to the island to the north. You must enter the tower on the island from the east by boat, by threading your way through the maze of rocks.
You will then be inside the Cult of the Sacred Item. Once inside, search the chest at (34,39) to get a key. Go through the door at (17,27) to enter the area where the cult stores their stolen items. The Orb is in the case at (16,34).
It’s time to escape. Go to (15,16) to activate the portal out, and step into the portal at (9,9). The Orb is yours. Use it when outdoors to fly.
Carnage in the Tower of Magi.
Around day 180, there is a disaster at the Tower of Magi. If you don’t go there immediate, Exile will be destroyed. There is little to gained in the mandatory side quest, beyond simple survival.
When you start getting messages indicating that something horrible has happened, head back to see Anaximander immediately. Go to the Portal Fortress and use the portal. You will be in the smoldering wreckage of the Tower of Magi.
This quest is mandatory and difficult, and if your party is unprepared, you may run into major difficulty. Be sure to stock up on potions and scrolls before heading down, save and restore often, and proceed carefully.
Once inside the ruined tower, go to speak with Solberg, who is hiding at (4,52). He will fill you in on what’s happened. You will need to go get the Blessed Athame, which is on the altar at (55,24). Proceed there around the outskirts of the dungeon, avoiding the center as much as possible.
There are potions at (27,40) for you. In addition, if you know already, the ghost at (52,40) can teach you Move Mountains which can help you enter the demon’s inner sanctum safely.
When you have the Athame and the spell Move Mountains (or Shatter), move around to the secret door at (4,10). Move through, and cast Move Mountains on the south wall of this room. Go through, down the passage to the south, a little east, and then up north, towards the portal at (12,11). When you get near it, demon guards will appear. Ignore them if you want, and move straight to the portal. When you reach it, cut it with the athame. The demons have been defeated, and you will be back in Upper Exile. You will now find several of the Tower of Magi’s residents in the Portal Fortress and Fort Emergence, where you can still buy spells from them.
Chapter 6. Walkthrough Part 3 – Blackcrag and the Endgame
Warning: This chapter reveals who is responsible for the mess on the surface. If you want this to remain a mystery, read no further.
Topics Covered:
The
Bunker
What is that building in New Cotra with no doors? How do I enter
it? What do I do inside?
Blackcrag Fortress
How do I get
in? What am I supposed to do with Prazac?
Footracer Province and
the Keep of Tinraya
How do I enter Footracer Province? How do I get
through the Keep of Tinraya? How do I escape from that cell?
The
Endgame
How do I pass the Great Walls? What do I do in the Keep of
Rentar-Ihrno? How do I win the game?
If you’ve done everything so far, you now know who is responsible for the monsters on the surface, and have expunged the evil critters from most of Valorim. It’s now time to strike back.
The Bunker
If you spoke to Sandra, who can be found in both Sharimik and Lorelei, you found out about a special place called the Bunker. It’s time to go there. Go find Captain Johnson in Fort Emergence. Ask him about ‘bunker’ and then about ‘Sandra’.
Now go to New Cotra. Go to (14,10) and the Bunker will open up. Go to Ostoth, talk to him, and then ask him about ‘Vahnatai’. Leave, return 4 days later, and search the chest at (12,13). You will now have a valuable new weapon.
Blackcrag Fortress
At this point, all of the plagues of monsters that have infested Valorim have been dealt with, except one. Footracer Province, in northwestern Valorim, is still filled with Alien Beasts. Also, that is the last place to search for those responsible for the plague. To enter there, you first need to see Empress Prazac in Blackcrag Fortress. First, go visit Dwaine, the Exile spy in the southeastern corner of Lorelei. He will tell where Prazac is, and to go see her. Then head north to Blackcrag Fortress.
Unfortunately, the fortress guards won’t let you in. There’s a quarantine on, and you are highly suspect. Instead, head east to the Guarded Tunnel. By the way, the Guarded Tunnel is easier if you bought passage from Geoffrey in Lorelei first. Whether you did or not, go to the secret room at (24,28) and press the button, and then go down the tunnel west which starts at (25,13).
At (14,4), a Doomguard will appear. Fight it until one of its copies dies. The easiest way to kill a doomguard is to take your strongest fighter and bless him or her repeatedly. Only strike the doomguard with high damage blows, and it'll split fewer times. Concentrate on the damaged doomguards, and once one finally dies, run to the west. Climb the stairway at (4,4).
Once in Blackcrag, proceed south to the secret door at (59,29), stopping to buy spells on the way if you want. Go down and through the secret door at (59,47), and then north to speak with Vladimir at (52,41). He will let you in to see Prazac. Enter her throne room and talk to her. Ask her about ‘mission’, and she will give you a message for Anaximander. Leave Blackcrag the way you came in.
Go see Anaximander back at Fort Emergence, and he will take Prazac’s scroll and give you another. Return to Blackcrag, and go see Prazac by the same route you took before. She will take Anaximander’s scroll and, in return give you permission to enter Footracer Province.
Footracer Province
At long last, you are in the endgame. The end is in sight. Enter Footracer Province through one of the two doors in the wall around it, and go to the Keep of Tinrays.
Once inside, descend the stairway at (45,47). Go through the secret door at (55,51) to find a boat. Take it north to (51,22). Go through the secret passage at (40,16), and walk over the rocks in the water. Go up to (28,7) and use the key from the Murder Cave to get in.
Go south to (11,48), enter the chamber, and get captured. You will be in a cell. Pause repeatedly until the shade appears and creates a secret door in the east wall. Send a character through to be teleported out.
Move your lone character back into and through the Vahnatai complex and search the case at (27,47). Press buttons ‘g’, ‘k’, and ‘i’. Go south to (37,62) and press the second crystal on the pedestal and your party will be reunited.
Search the case at (23,62) to get a key. Head out to the west, fight the big Vahnatai fight, and go climb the stairway at (19,27).
You will be inside the black Vahnatai tower. Head west, and climb down the stairway at (3,32). Follow the corridor, use the key, and leave Tinraya to the west. Beyond these mountains lies the Keep of Rentar-Ihrno, where your quest ends.
Getting to the Keep
Once outside, there is a secret pass through the mountains to the north. Head up to the Great Walls.
If you prayed at 4 or 5 of the magic stone circles, you will first be forced to go up to the Great Circle. Go there, break the altar, and fight the demons. When done, head back down and go to the New Factory.
The New Factory is a very complicate maze, filled with fireball traps and conveyor belts. However, the Vahnatai included a secret mechanism to get through quickly. Go south to the secret passage at (10,17). Go through, and back to the passage at (6,19). Go south to the secret passage through the machinery at (6,44). Search the machinery at (4,44) and press the button, and you’ll be at the other end!
Once outside, walk east to the Great Walls. Fight your way through this dungeon to the east. To open the portcullis out to the east, step on the rune at (48,9).
Leave the dungeon. If you didn’t get the anti-Vahnatai weapon from the Bunker and had to kill the Crystal Souls in the Keep of Tinraya, proceed directly to the Keep of Rentar-Ihrno. Otherwise, walk to the Vahnatai Home.
At the Vahnatai Home, speak with Bon- Ihrno. He’ll explain what’s going on, and give hints for what to do at the fortress. There are also potions and a place to rest. When you’re ready, go to the Keep of Rentar-Ihrno.
Winning the Game
To destroy the Keep of Rentar-Ihrno, you’ll need to blow it up. Fortunately, the machinery underneath is very unstable. You can, with persistence and extreme violence, get it to self- destruct.
To do so, you’ll need to activate all the crystals under the keep. Go inside, but don’t enter the big hall in the middle yet. Instead, go north, and press the button at (34,24). Go down the stairs at (42,2). On the lower level, press the crystals at (12,13), and then (13,17). Climb back to the main level, and climb back down at (61,1). Press the crystals at (36,9), (41,13), and (44,19), in that order. Climb back up, and go down the stairs at (62,60). Press the crystals at (45,44), (45,28), and (35,25), in that order. Finally, climb back up, and go down the stairs at (34,59). Press the crystals at (12,40), and then (16,29).
At last, you can finish the game. Return to the keep and enter the central hall at (22,32). You cannot kill Rentar- Ihrno. However, you don’t need to – her control panel is what you really need. Move directly east to (42,32). If you don’t have Erika’s amulet, when you reach the pedestal, Rentar-Ihrno teleports you away. You’ll need to approach the pedestal four more times before you’ll actually reach it. If you have Erika’s amulet, you’ll reach the pedestal on the first try.
Once you reach the pedestal, click on the buttons, ‘Release Slime Compounds’, ‘Power Up Chargers’, and ‘Begin Process’ in that order. Congratulations! Enjoy the fireworks!
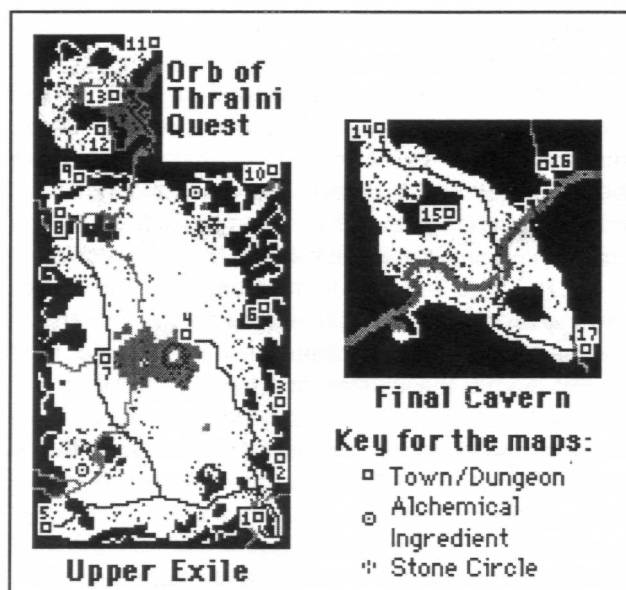
Chapter 7. Maps of the Caverns
Here are maps of Upper Exile, the caverns near Rentar-Ihrno’s fortress, and the caves where the stolen Orb of Thralni is taken to. The maps also contains the key, which applies to all these maps.
|
1. Fort Emergence |
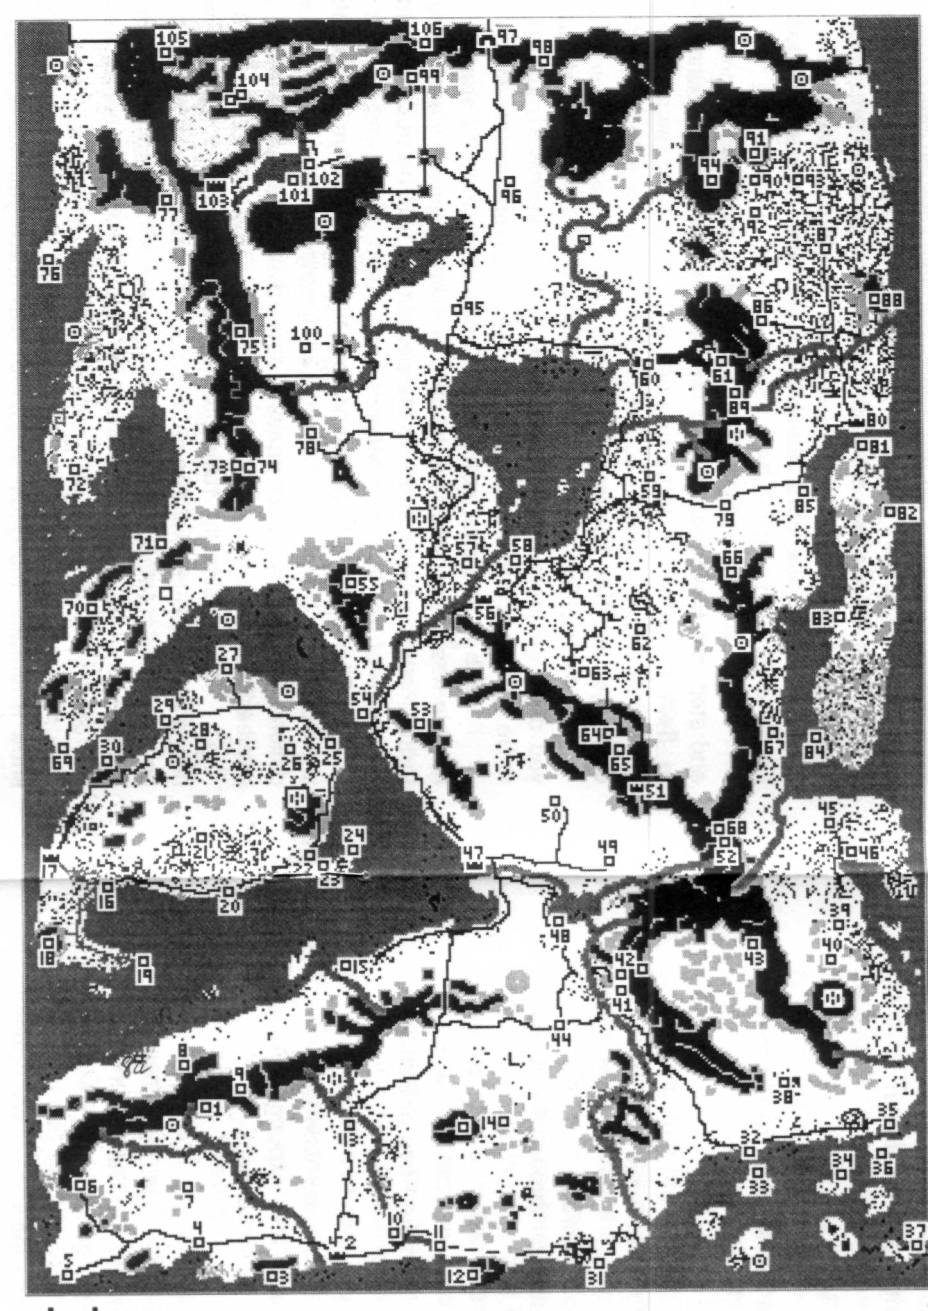
| 1. Ft. Emergence | 28. Friendly Roaches | 56. Lorelei | 82. Vila |
| 2. Krizsan | 29. Hectar | 57. Malloc | 83. Torria |
| 3. Agate Tower | 31. Bolton | 58. Bengaro | 84. Tower of Zkal |
| 4, Delan | 32. Libras | 59. Appleton | 85. Mernia |
| 5. Delis | 33. Lost Isle | 60. Bremerton | 86. Greendale |
| 6. Pergies | 34. Gebra | 61. Pit of the Wyrm | 87. Tevrono |
| 7. Guhkbar’s Pit | 35. Storm Port | 62. Poulsbo | 88. Remote Aerie |
| 8. Distant Hut | 36. Gorst | 63. Dellston | 89. Drake Aerie |
| 9. Unicorn Cave | 37. Monastery of Madness | 64. Giant Forge | 90. Tower of Shifting Floors |
| 10. Silvar | 38. Dryad's Grove | 65. Cavern of the Giants | 91. North Spire |
| 11. Colchis | 39. Tower of Vahkohs | 66. Isolated Inn | 92. South Spire |
| 12. Slime Pit | 40. Fiery Cave | 67. Woodsy Tower | 93. East Spire |
| 13. Inn of Blades | 41. Golddale | 68. Concealed Tunnel | 94. West Spire |
| 14. Wolfrider Warren | 42. Golddale Mines | 68. Concealed Tunnel | 95. Moon |
| 15. Farport | 43. Lair of the Ursagi | 69. Marish | 96. Draigoth |
| 16. Port Townsend | 44. Porter's Retreat | 70. Chasm of Screams | 97. Blackcrag Fortress |
| 17. Shayder | 45. Lennus | 71. Calloc | 98. Guarded Tunnel |
| 18. Point Contemplation | 46. Squiggus | 72. Wainscotting | 99. Wyvern Pass |
| 19. Southpoint Lighthouse | 47. Sharimik | 73.Lair of Motrax | 100. Manara |
| 20. Bavner | 48. Gidrik | 74. Lair of Khoth | 101. Ovdipur |
| 21. Friendly Spiders | 49. Angel's Rest | 75. Defiled Crypt | 102. Dellskeep |
| 22. Kuper | 50. Aminro | 76. Erox | 103. Keep of Tinraya |
| 23. Kneece | 51. Castle Troglo | 77. Remote Cavern | 104. New Factory |
| 24. Lair of Drakos | 52. Troglo Temple | 78. Dorngas | 105. Great Circle |
| 25. Fenris Port | 53. House on a Hill | 79. Spineridge | 106. Great Walls |
| 26. Spiral Crypt | 54. Softport | 80. Gale | |
| 27. Northpoint Lighthouse | 55. Adobe Hut | 81. Execa |
Chapter 8. The Artifact Quests
In addition to all the other adventures Exile III provides you with, the land of Valorim contains five powerful artifacts. All of them are very useful, all of them are tricky to find, and none of them are necessary to win the game. They are, however, neat, and can be fun (or frustrating to find). You can find where one of them is in each of Valorim’s five largest cities.
The Ring of Endless Magery
This is the hardest artifact quest, only to be attempted by those strong of spirit. This rings starts with 40 charges, and each use restores a large number of spell points. To find it, first find the Mage With No Name. He alternates between being at (56,15) in Krizsan, and at (9,30) in Delan. Ask him about ‘location’, and pay 2500 gold for the information.
Go up to Gale, and buy the skiff from Mrrurr. Goto (36,56) and use it to cross to Maddok Isle. Go south, and enter the Tower of Zkal.
In the labyrinth, start by going north. Pull the lever at (40,1), and go through the secret door at (25,6). Go through the portal at (9,10). Go east, pass through 2 secret doors, and enter the portal at (11,38). Go down the stairs at (1,15).
On level 2, go through the portal at (12,31). Go through the portal at (46,40) twice (notice the location of the mushrooms on the floor is changing). Go through the portal at (44,46) and then through the portal at (46,40).
In the rooms to the north are moving walls, which will constantly threaten to crush you. There are two ways to break them up or deflect them: cast a fire or force barrier, or summon monster to turn them around. The easiest way (not available to Anama) is to create a fire barrier and stand inside it until it’s safe. You’ll need energy potions to drink to get spell points.
Get north to (46,1), and pull the lever. Kill the lich at (32,3), pull the lever at (30,1), and get the Ring of Endless Magery at (30,21).
Prachtar’s Plate Mail
This is the most powerful suit of armor in Exile III. You can find out where to get it in the library in Gale. To get into the library, find the herb house, hidden in the northwest corner of Gale. Ask the house owner at (12,20) about ‘ownership’, and get the key for 1000 gold. To enter the library, pass through the secret door at (28,54). Search the bookshelf at (26,53).
To get to the Lair of Drakos, go to the Isle of Bigail, and take the ferry in Kuper across to Kneece. To get into the lair, enter it from the west. Move south to a secret passage at (10,42). Fight your way through, pulling the lever at (37,29) to pass through the wall of pillars to its west.
To get through the final pillar puzzle on level 1, start at (21,30). Go northwest, west, east, west, east, east, east, east, west, east, and north. Go down the stairs at (27,25).
Moving through level 2 is a very straightforward march and battle. The plate mail is on the body at (7,1).
Fury Crossbow
The Fury Crossbow is an extremely powerful missile weapon, which provides magical protection as well. You find out about this on the Isle of Bigail. Find Judith, who moves between Shayder and Hectar. Ask her about ‘location’, and pay the 1000 gold. She will send you to the Pit of the Wyrm, due east of Bremerton.
Once inside, go through the tunnels at (40,30) to the tunnel at (17,29). Go down to level 2 at (18,43).
Work your way around the dungeon to (23,26). Go through the secret passage at (30,22). Stop on the rune at (14,26), and pull the lever at (16,26).
Enter the crypt at (15,42). From (15,42), walk east, north, north, east, south, east, south, east, east, north, north, east, north. Get the crossbow. To get out again, from (21,39), walk south, west, south, west, west, north, west, south, west, south.
The Recipe for Knowledge Brew
Knowledge brew is the most powerful alchemical concoction, and one of the few ways to gain skill points without gaining levels. You find out to get it in the towns around Lorelei. Find the bard/priest Foxfire. She moves from Bengaro to Poulsbo to Malloc and back until these towns get destroyed, at which point she moves to Dorngas. When you find her, ask her about ‘payment’. The information costs 500 gold.
Head to the very southeastern tip of Valorim. Take the ferry west of Storm Port to the island to the south, then the ferry in Gorst, and finally the small island ferries southeast to the Monastery of Madness. Inside the monastery, climb the stairway up at (37,5), or at (12,5).
On the second level, fight your way to the library door at (5,15). Search the bookshelf at (10,20) for the recipe.
This dungeon has a lot of other battles, treasure, and stuff, and is worth a good look.
The Black Halberd
The Black Halberd is the most powerful pole weapon in Exile III. You find out how to get it from Masok. He starts in Angel’s Rest, near Sharimik, and moves to Softport when that town gets wrecked. Press the buy button, and for 2000 gold, you will get a map.
Go to the Remote Cave, north of Calloc. Once inside, step on the mushrooms at (32,1), and walk straight south. Go west to the crates at (4,18), and push one onto the rune at (13,2). To get a crate there, remember that when you push a crate into the wall, you trade places with it, and that you can move diagonally. Once the crate is on the rune, look inside it, get the scroll, and read it. Leave to the south. Stand on the triangle at (8,25). Go south, south, east, east, south, south, east, south, south, west four times, north, north. Go east. At the rune and light puzzle, step on the rune at (32,40) only (so that six lights are lit) and leave to the east.
Head up the passage to the east. To escape, search the stalagmites at 943,27), and head north. When you have three passages to choose form, go down the center passage, starting at (29,22), and climb down to the lower level.
In the square rooms below, leave to the east, to the north, and to the east. Fight your way north, and go through the secret passage at (20,15). The halberd is at (12,1).
Chapter 9. Other Puzzles
This chapter tell how to solve many of the Exile III’s other puzzles. If your quandary wasn’t described at the beginning of Chapters 4-6, and doesn’t involve one of the mission quests in Chapter 8, there is a good chance its solution will be found here.
When looking for your question, first look in the General Problems section, for puzzles that appear in many places. If not there, look for the section corresponding to the geographical area you are in. When you find the right question, it will have a number (or numbers) after it. Look up the hint with that number in Chapter 10. if more than one number is given, the earlier numbers correspond to subtler hits, or to the earlier part of the problem. Consult the hints in order, until you find out what you want to know.
General Problems
I want to cross a section of mountains or a river. How do I do it? 25
My party keeps getting diseased for no reason. How do I stop it? 46
How do I pass force barriers? 63
What are some easy ways to make money?
1, 26, 64
Where can I store my items? 47
How do I get into Sharimik? Lorelei? 65
How do I get into Gale? 2
I was late with a job, and now that dispatcher won’t hire me anymore. What do I do? 27
Some cracked or moldy wall is blocking my path. How do I get pat it? 77
Outdoors, I found this strange stone circle. What do I do with it? 50,
31, 7
Upper Exile
Fort Emergence, how do I get into the room with the Orb of Thralni? 66
In Fort Emergence, how do I pass the hidden magical barrier in the mage’s section? 3
In the Portal Fortress, how do I get Seles to let me use the portal? 28
In the Portal Fortress, how do I get Denise’s charm? 48
In Ghikra, how do I get in to see the Crystal Souls? 4
In Ghikra, where to I find Koriba’s Statue? 67
In Ghikra, how do I enter the southeast section? 29
In the Bandit Hideout, how do I get in? 5
In New Cotra, what is that building in the northwest corner? 49
How do I reach Erika’s tower? 30
How do I get to island in the middle of the big lake? 6
Krizsan Province
What do I do with all these unicorn horns? 68
At the Distant Hut, what do I do? 51
I stole something from Ernest. Can I make him not hate me? 8
In Pergies, how do I do Paulo’s mission? 32
Someone told be about a mage with no name. Where do I find him? 78
What do I do with the hermits who give you messages? 9
In Guhkbar’s Pit, what do I do? 33
A dryad wants me to bring her something beautiful. Where is it? 52
The Isle of Bigail
In Shayder, how do I get the package Irvine wants to give me? 10
What’s in it? 34
How do I deliver it? 53
In Shayder, how do I get to the second floor of the Anama temple? 76
I robbed the Anama, and the people of Shayder hate me! What do I do? 79
Disease is wiping me out. What do I do? 11
I got trapped in the Spiral Crypt. How do I get out? 35, 69
Golddale and Southeastern Valorim
How do I climb the valley west of the Wolfrider Warren? 12
In Golddale, how do I get the book Ivanova wants? 36
In Golddale, how do I complete Delenn’s slith mission? 54
In Golddale, how do I complete Delenn’s ursag mission? 13
How do I kill the ogre in the Dryad’s Grove? 75,
70, 14
What’s the deal with the weird monks on the southeastern islands? 71
What do I do with Carmine in Lennus? 55
In the Tomb of Vahkohs, how do I get the treasure? 37
I killed Vahkohs, but his spirit torments me still! How do I stop it? 15
In Gidrik, Zamora sold me the location of a scroll in Aminro. What do I do about this?
72, 38
Karnold Province
In Sharimik, Ginny lost a ring. What can I do? 16
What do I do at the House on a Hill? 56
Midori Province
I’m carrying a package from Shayder. How do I get into Lorelei? 39
I got a package into Lorelei. What do I do with it now? 17
I’ve heard there is a Guild of Thieves in Lorelei. How do I contact it? 57
I’ve heard there is an Exile spy in Lorelei. Where is he? 40
In Lorelei, Bruskrud gave me a mission to get personal effects and rescue prisoners.
How do I do this? 18
In Lorelei, how do I buy Hawke’s Manse? 58
In Hawke’s Manse, what do I do with the ghost? 41
I’ve heard of a giant slaying hammer called Smite. Where is it? 19
In Malloc, Mia wants a ring. Where is it? 59
What am I supposed to do at the Isolated Inn? 42
In the Woodsy Tower, I’m trapped. How do I get out? 20
Northwestern Valorim
How do I get through the gates in the huge outdoor wall north of Dorngas? 60
In Marish, how do I complete Yale’s quest? 43
In Calloc, how do I complete Rabellino’s nephilim quest? 21
In the Defiled Crypt, what do I do? 73, 61, 22
In Erox, what’s going on? 74
In the Remote Cave, how do I get through? 44
Monoroe Province
In Gale, how do I get into the library? 23
What does Skribbane herb do? 45
I’m addicted to Skribbane herb. How do I cure myself? 62
What do I do about the golems? How do I enter the northern golem spire? 24
Blackcrag Fortress, Footracer Province, the Keep of Tinraya, and Beyond
Everything here is answered in Chapter 6.
Chapter 10. The Answers
3. When you've ended one of the monster plagues on the surface, ask Mazumdar about 'tomes'.
4. Ask Rentar-Ihrno about 'visit'.
5. There are secret passages at (11,37) and (33,34).
9. You can carry 10 messages for them. Then they won't give you any more. It's easy money.
10. Ask Irvine about 'shipping'. Look in the chest at (17,54).
12. Enter the Wolfrider Warren. Pull the lever at (27,9). Exit the dungeon to the west.
13. Go east to the Lair of the Ursagi. Kill at least 38 monsters.
15. Go back to the Tower of Vahkohs. Break the crystal at (3,25) to end the curse.
16. Ask Sloan about 'ring'. Walk to (4,59) to find the ring. Take it to Ginny.
17. Go to Kendra. Ask her about 'package'.
19. It's in the Giant's Forge, at (23,43).
23. In Chapter 8, read about Pachtar's Plate Mail.
25. You need the Orb of Thralni. Read about it in Chapter 5. Alternately, you can get the Flight spell in Moon.
28. End one of the monster plagues (like the slimes or roaches) on the surface.
34. Raw Skribbane Herb, in illicit and powerful drug, which will be sold in Gale.
36. Go to the Distant Hut. Search the bookshelf at (12,15).
37. Find your way to Vahkohs. Talk to him, and say 'agree'. You will be able to loot his treasury.
40. Dwaine is in a secret room in the southeast corner.
42. Sleep, kill the undead, and search the rock at (4,43).
43. Go north to the Chasm of Screams. Kill the nagas in the northwest corner.
44. Read about the Black Halberd in Chapter 8.
46. You're probably carrying some uranium. Drop it.
47. You can leave items in the storeroom in Fort Emergence, the House on a Hill, or Hawke's Manse.
48. Use the portal to go down to the Tower of Magi, and search at (52,37).
49. It's the Bunker. This is described in Chapter 7.
52. The perfect flower is at the end of a long valley northwest of Libras. Bring it to her.
53. Carry it to Lorelei and give it to Kendra. To find out how to get into Lorelei, read hint 39.
56. You can leave items there safely, and learn Magic Map from the spell book in the house.
57. Deliver the package from Shayder to Lorelei, and then ask Kendra about 'guild'.
58. Talk to Lyle, and hit hte Buy button. It costs 8000 gold.
59. It's on an island to the northeast. You need to able to fly to reach it.
60. You need to speak with Empress Prazac. See Chapter 7.
62. Don't use any more. The withdrawal symptoms will fade with time.
65. You need to have wiped out either the slimes or the roaches.
66. You can't. Read the Orb of Thralni Section in Chapter 6.
68. Sell them to Captain Agrod. He's in Krizsan.
70. Ask the first gremlim about 'rose', Ask the second gremlin about '5678'.
71. Read the section in Chapter 8 on Knowledge Brew Recipe.
72. Go to Aminro, and search at (29,16).
73. Ask Abra about 'reward' to get the mission. Get the key at (1,16).
74. The townspeople where killed by rakshasi. Drink the wine in the bar to make them appear.
77. Use the Move Mountain spell. Buy it from Paulo in Pergies.
78. Read the section on the Ring of Endless Magery, in Chapter 8.
79. Once you rob the Anama, the people of Shayder will always attack you.
Chapter 11. Other Things to Try
Listed here are a variety of other fun things to try, places to look at, or other neat details of Exile III: Ruined World. Most are unrelated to finishing the game, but are there just for fun.
The Monastery of Madness (part of the quest for the Knowledge Brew recipe) is great fun, inspired by the viewing of many, many Hong Kong kung-fu movies. Recommended.
Be sure to talk to all of the types of animals at least once.
There is a place to buy each of the alchemical ingredients in southeastern Valorim. The place to buy mandrake is outdoors, and extremely difficult to find. Can you find it?
Be sure to fly out to all the little islands outdoors.
Have you selected Item Info for pants? Shirts? Sticks and rocks?
The many room in Erika’s tower contains a variety of interesting tricks and traps.
For a real challenge, play through the whole game again, as an Anama. It is possible to win the game with no spell casters. However, it’s not at all easy.
Chapter 12. What the Items Do
The easiest way to find out what practically all of the items do is to
identify the item and click on the Item Info button (the ‘i’ button to the
right of the item’s name). Most item’s abilities are named there.
Those
that aren’t:
Wand of Carruno – Increases strength of monster it’s fired at.
Brew of
Lethe, Powder of Lethe – Drains experience.
Wand of Vorb – Damages
user.
Bow of Kag – Uses arrows twice as fast.
Asp Gloves – Poisons
wearer.
Uranium Bar – Diseases party.
Unicorn Horn – Sell to Captain
Agrod in Krizsan.
Golem Gems – Sell them.
Brew of Battle – Hastes and
blesses drinker.